Managed Hosting
How to Fix the 500 Internal Server Error in WordPress: A Step-by-Step Guide
Seeing a 500 Internal server error instead of your WordPress website? The easiest fix is to sign up for managed WordPress hosting like this and sit back while your host tracks down and resolves the issue. But if you’re a hands-on website owner who likes diving into tech issues, use this post as a guide to get your website up and running.
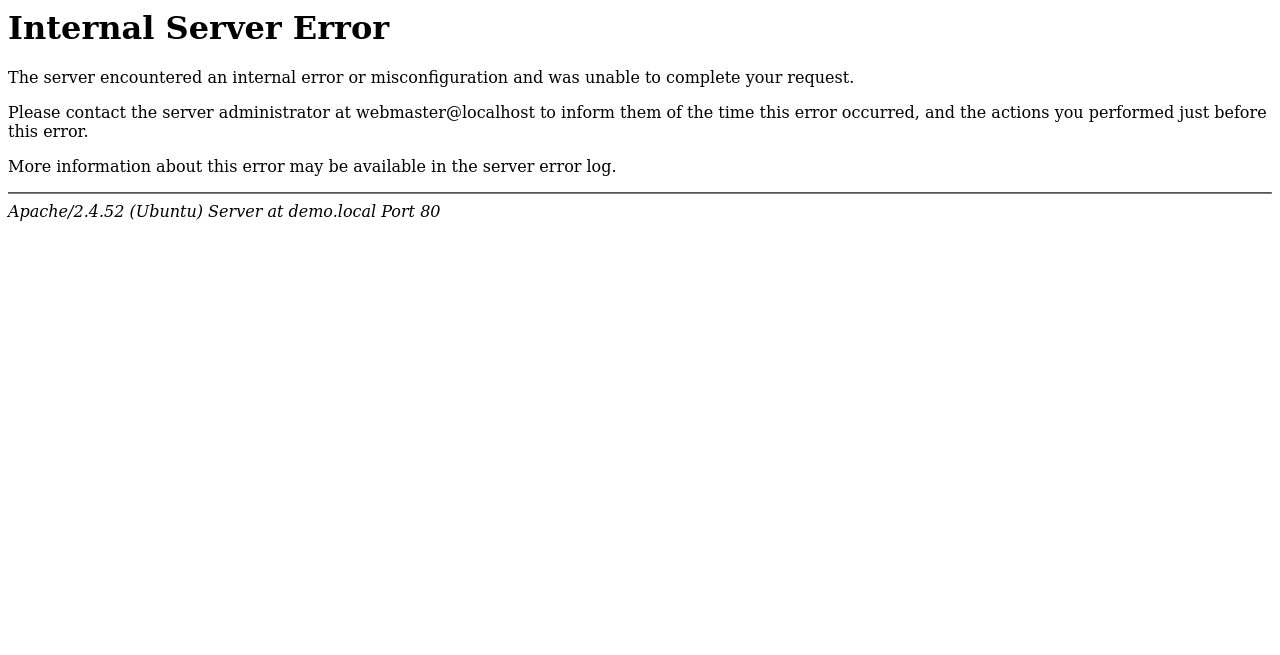
First, a little introduction to server response codes (a.k.a HTTP ‘status codes’), which includes the ‘500 internal server error’ code. These numerical values are returned by a web server as the result of a requested operation. These codes are part of the HTTP standard, and can be used to identify the status of the request and whether it was successful, encountered errors, or requires further action.
These response codes are crucial for web development and maintenance, since they provide feedback about the interaction between the client and server. This is useful during troubleshooting, and can be used to enhance the user experience.
Here are some examples:
The server has received the request, but doesn’t have a result yet.
| Response Code | Meaning |
|---|---|
| 102 Processing | The server has received the request, but doesn’t have a result yet. |
| 200 OK | The request was successful. |
| 301 Moved permanently | The requested resource has been moved permanently. The new URL is part of the response. |
| 404 Not found | The server cannot find the requested resource. |
These numerical values aren’t just randomly assigned. Instead, they indicate categories of response codes:
| Code Range | Response Type |
|---|---|
| 100-199 | Informational responses |
| 200-299 | Successful responses |
| 300-399 | Redirection responses |
| 400-499 | Client error responses |
| 500-599 | Server error responses |
You can find more information about response codes at Mozilla’s MDN.
Fixing the 500 Internal Server Error
Of the response codes most frequently encountered, the ‘500 Internal server error’ is perhaps the most confusing given its lack of specificity. With that in mind, there are some common fixes that can be employed to find and resolve any potential causes and get your WordPress site back on track.
Check the error logs
In some cases checking the error logs will be recommended as a last resort. But good practice suggests it should be your first port of call – not only to save time, but also to avoid unintentional errors caused by trial and error.
To illustrate this point, I added a garbage line to the .htaccess file that produced a 500 internal server error:
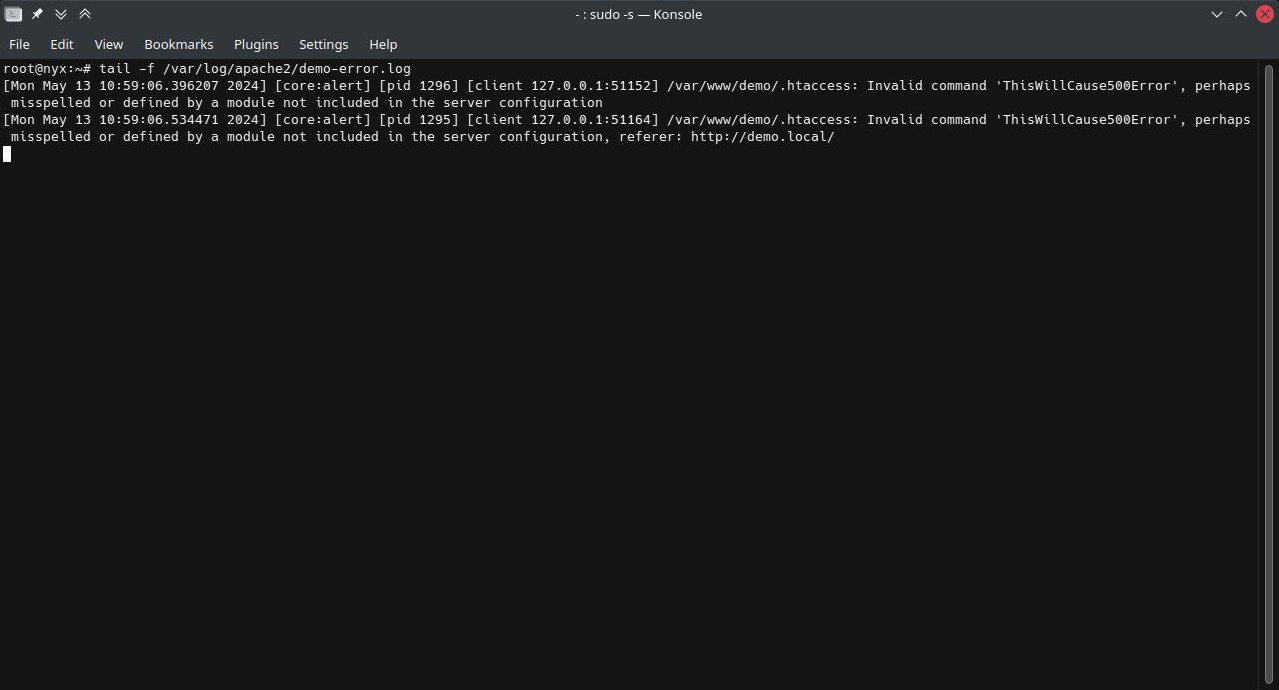
Checking the web server’s logs (Apache in this case) shows exactly what I did to create this error:
tail -f /var/log/apache2/demo-error.log
[Wed January 17 10:59:06.534471 2024] [core:alert] [pid 1295] [client 127.0.0.1:51164] /var/www/demo/.htaccess: Invalid command 'ThisWillCause500Error', perhaps misspelled or defined by a module not included in the server configuration, referrer: http://demo.local/
As you can see, I added ‘ThisWillCause500Error’ to the .htaccess file. To the web server, there is no distinction between this line of gibberish and a command that contains a typo, omission, or some other type of error.
Check your .htaccess file
Speaking of the .htaccess file, it can be a good place to start if the logs don’t pinpoint any specific error. But, if you are reading this, chances are you may not have enough experience to identify any common or even uncommon errors. To that end, using an online .htaccess file checker can make things a little easier. Needless to say, don’t include any sensitive information included your .htaccess file.
For the purposes of this post I used madewithlove’s htaccess tester. But using online testers comes with the disclaimer that they’re not that comprehensive; they’re built to test for a specific set of items, and everything outside that set will most likely be flagged as unknown.
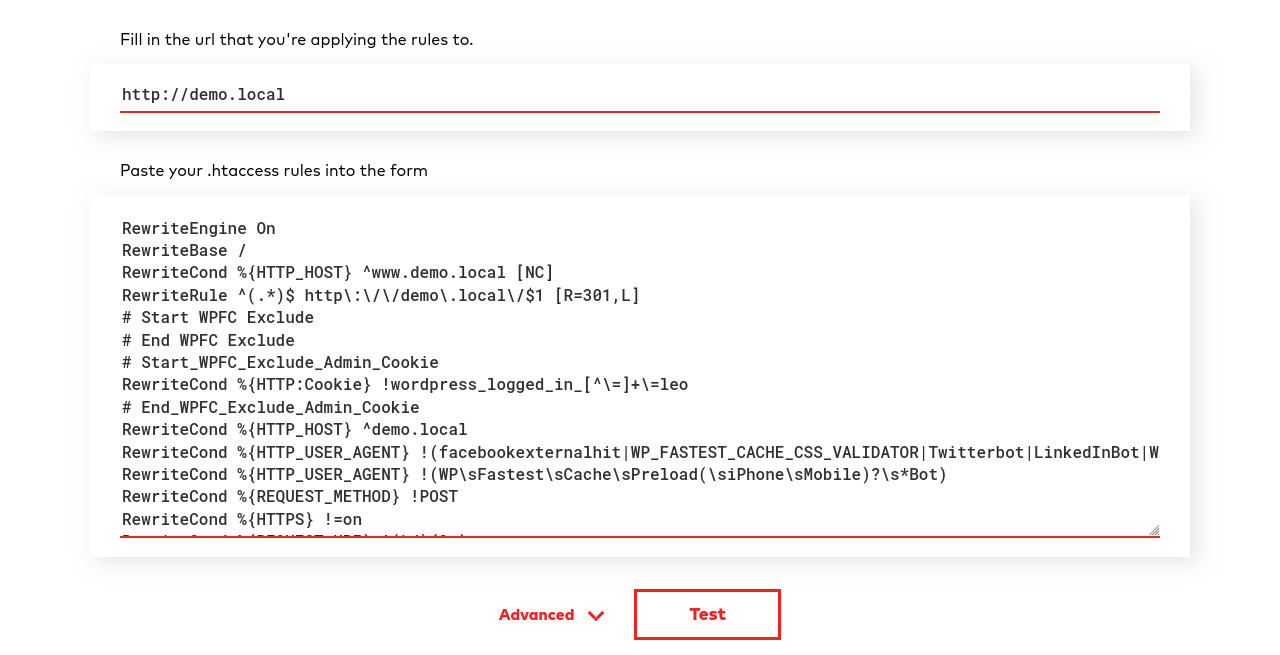
As an alternative method to determine whether it’s your .htaccess file causing the 500 internal server error, ask your hosting company to create a staging site of your live site, and replace the content of the staging site’s .htaccess file with the standard WordPress .htaccess content:
# BEGIN WordPress
# The directives (lines) between "BEGIN WordPress" and "END WordPress" are
# dynamically generated, and should only be modified via WordPress filters.
# Any changes to the directives between these markers will be overwritten.
<IfModule mod_rewrite.c>
RewriteEngine On
RewriteRule .* - [E=HTTP_AUTHORIZATION:%{HTTP:Authorization}]
RewriteBase /
RewriteRule ^index\.php$ - [L]
RewriteCond %{REQUEST_FILENAME} !-f
RewriteCond %{REQUEST_FILENAME} !-d
RewriteRule . /index.php [L]
</IfModule>
# END WordPress
While this method may not pinpoint the cause of the 500 internal server error, it should give you an idea whether an errant line in your .htaccess file is the culprit.
PHP memory limit
The PHP memory limit specifies how much memory a PHP script may consume. Since WordPress is mainly made up of a collection of PHP files, this limit also applies here: too little memory can cause a 500 internal server error.
Diagnosing the problem can be tricky, but if your WordPress site seems slow or unresponsive, and if the error logs indicate as much (too little memory), increasing the memory available to your site can resolve the issue.
Note: Setting the memory_limit in php.ini and the WP_MEMORY_LIMIT directive in wp-config.php are not the same. In WordPress, the WP_MEMORY_LIMIT setting does not inherently take precedence over the PHP memory limit set in php.ini or other configurations like .htaccess. Instead, WP_MEMORY_LIMIT specifies the maximum amount of memory that WordPress can use, but it is capped at the maximum memory limit set by PHP.
Increasing the PHP memory limit can be done in one of several ways. Keep in mind that you won’t be able to use more than the current memory limit allocated to your account or server.
Method 1: Edit PHP.ini
This is the main configuration file for PHP. Changes made in this file affect all applications running on the server that use PHP. You can find the memory_limit directive in this file and modify it as needed. For different environments (like CLI and Apache), you may have separate php.ini files:
- For Apache:
/etc/php/[version]/apache2/php.ini - For CLI:
/etc/php/[version]/cli/php.ini
Method 2: .htaccess file
.htaccess File: If PHP is running as an Apache module, you can also specify memory limits in the .htaccess file, which affects only the directory in which the .htaccess file is located and all subdirectories. You would use the php_value directive to set the memory limit like this:
php_value memory_limit 128M
Method 3: Apache Configuration File
Similar to the .htaccess method, you can set this in the Apache configuration files (httpd.conf or apache2.conf) for a specific directory or domain:
<Directory "/var/www/html">
php_value memory_limit 128M
</Directory>
Method 4: WordPress’s wp-config.php
You’ll want to insert a line of code that specifies the new memory limit. It’s a good practice to place this line of code just before the line that says /* That's all, stop editing! Happy publishing. */.
Here’s the line you would add:
define('WP_MEMORY_LIMIT', '256M');
Plugins & Themes
Plugin conflicts and broken themes is code not behaving the way it should, which can cause a 500 internal server error. Follow the steps below to test whether the 500 internal server error is caused by a plugin or a theme.
Note: It is strongly recommended to work on a dev or staging copy of your live WordPress site.
To test whether it’s a plugin (WP Dashboard):
Head over to Plugins > Installed plugins in the WordPress dashboard. Select all plugins and deactivate them.
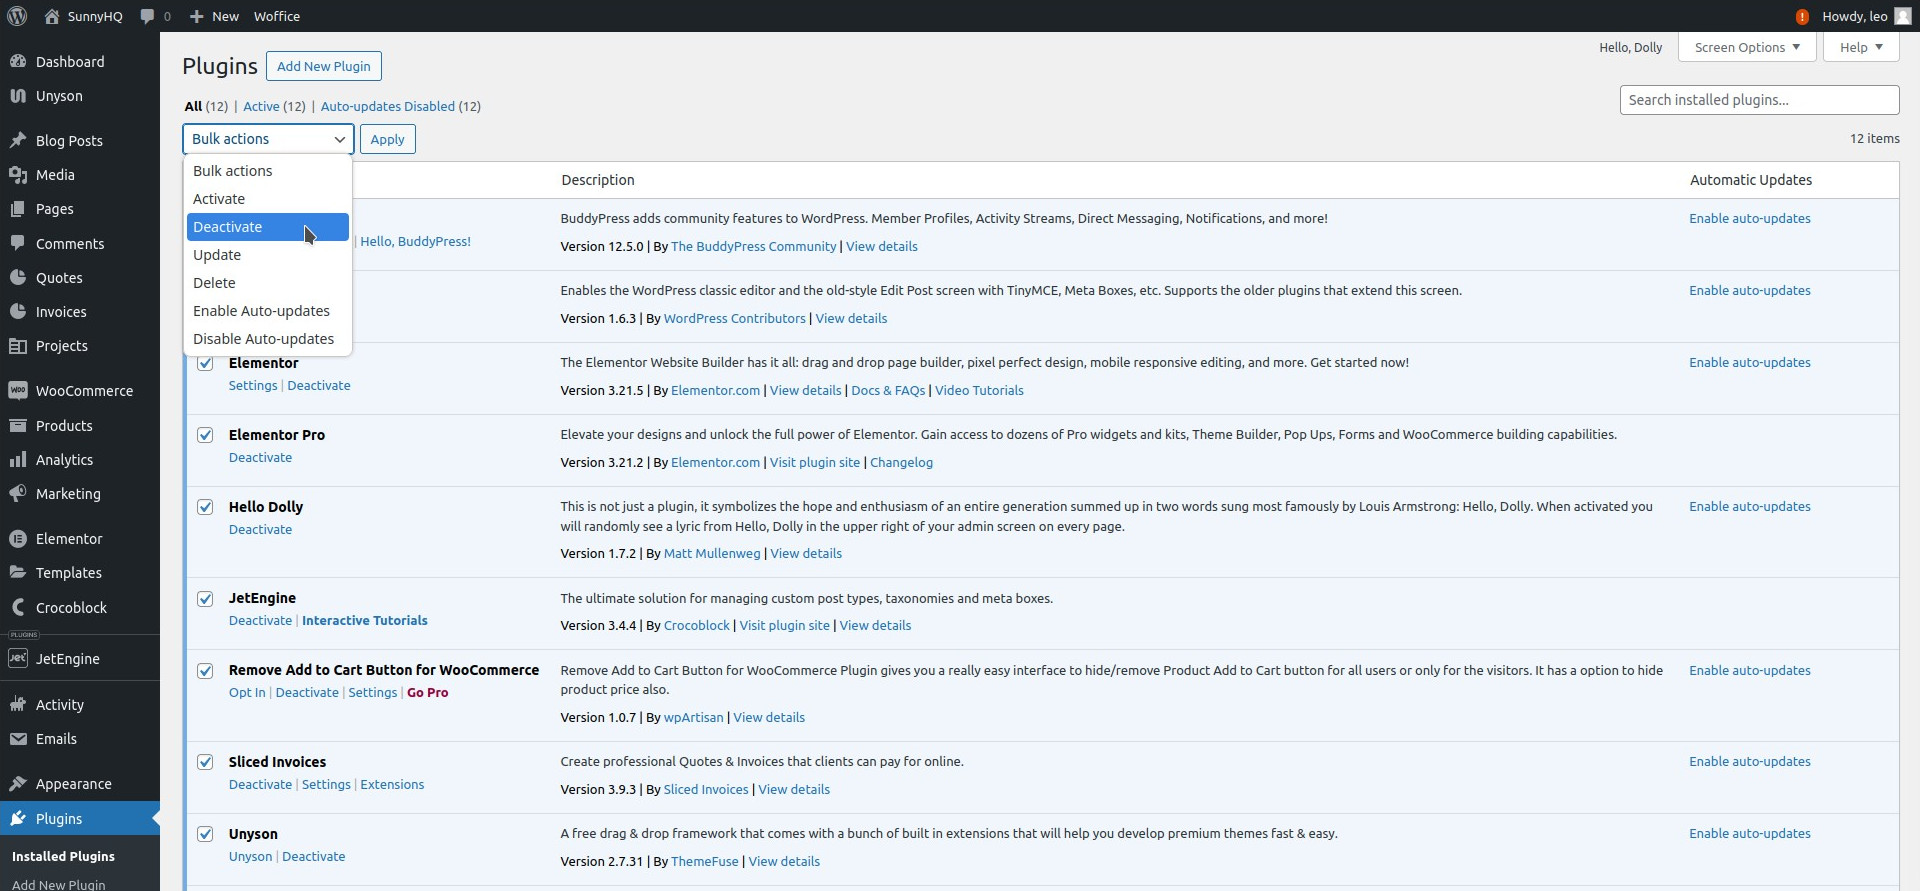
When all plugins have been deactivated, start reactivating one by one, testing whether the 500 internal server error returns after each activation.
To test whether it’s a plugin (cPanel):
Log into your cPanel account and head over to public_html > wp-content. Right-click on the plugins directory and select Rename. In the image below, I renamed the plugins directory to plugins_OLD.

Renaming the plugins directory will automatically cause all plugins to be deactivated as soon as the WordPress dashboard is reloaded. You can now rename the plugins_OLD directory back to plugins and start activating all plugins one by one, testing whether the 500 internal server error returns after each activation.
Note: If the 500 internal server error persists even when all plugins have been deactivated, then it’s likely not a plugin causing the error.
To test whether it’s a theme (WP Dashboard):
Navigate to Appearance > Themes from the WordPress dashboard. Activate a different theme (not a parent or a child theme of your current theme) to see if that resolves the 500 internal server error.
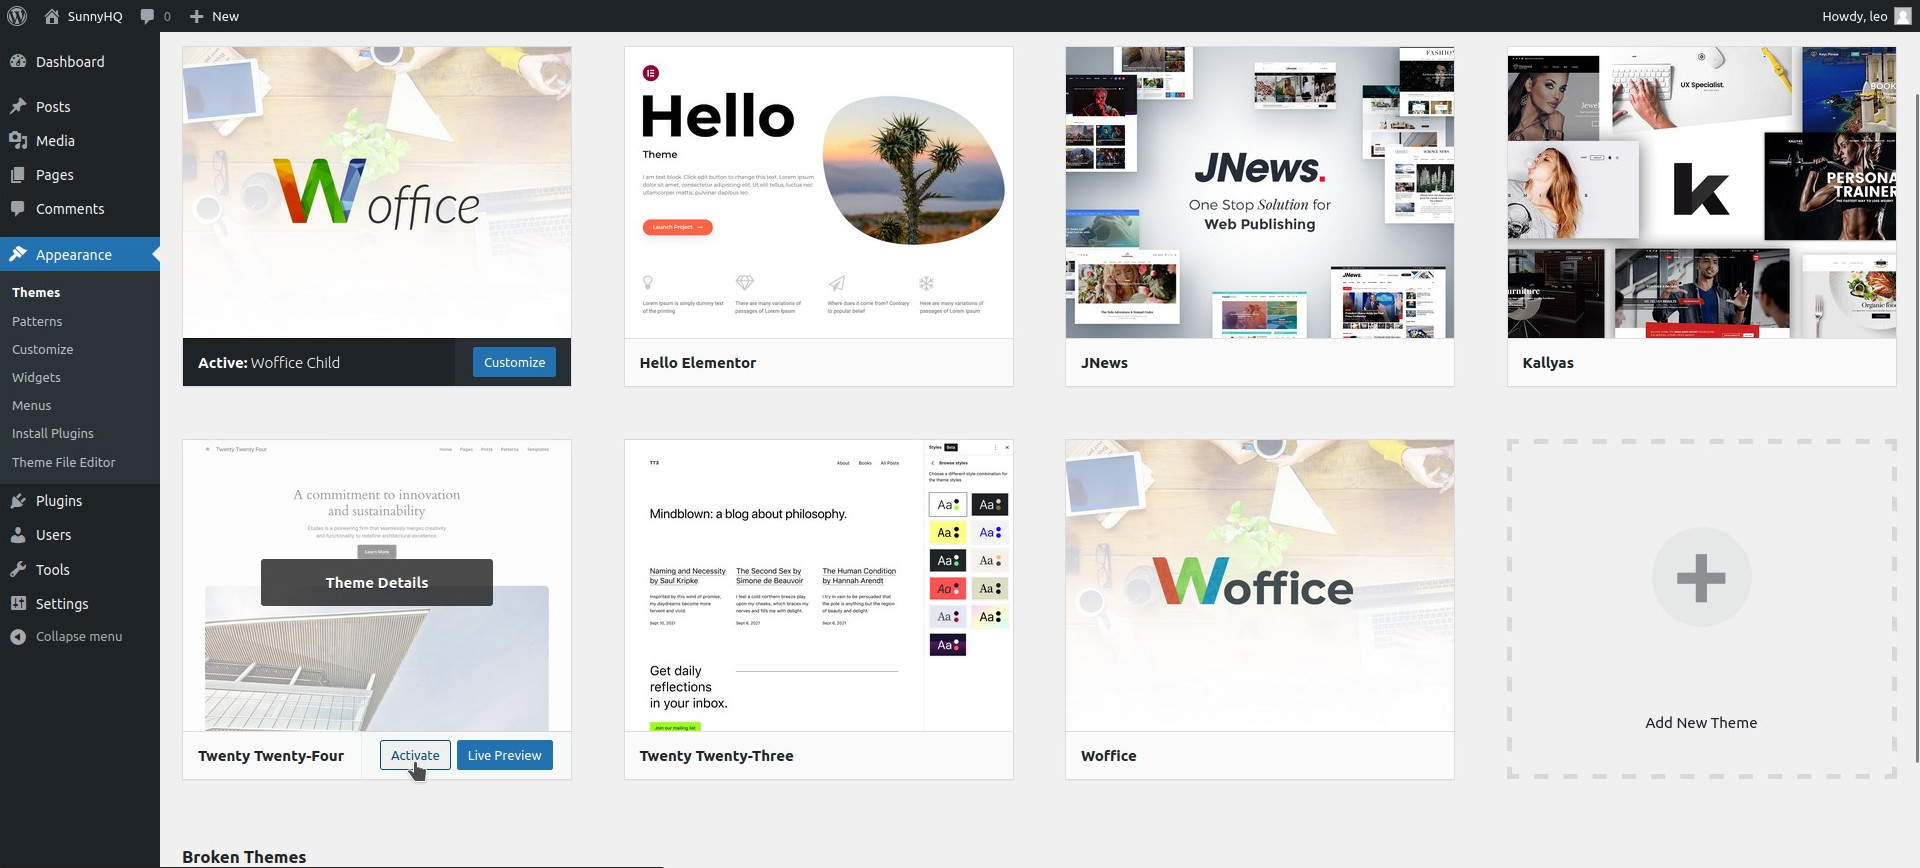
Pro tip: Always keep one of the basic WordPress themes (e.g. Twenty Twenty-Four) installed as a stable fallback for situations like this.
To test whether it’s a theme (cPanel):
Just like we did with plugins above, log into your cPanel account and head over to public_html > wp-content. Right-click on the themes directory and select Rename. In the image below, I renamed the themes directory to themes_OLD.
 In the WordPress dashboard, head over to Appearance > Themes. You’ll get an error that your previously active theme’s directory can’t be found. That’s okay.
Switch back to your cPanel window and rename themes_OLD back to themes. If all goes well, WordPress will automatically activate one of its basic themes such as Twenty Twenty-Four.
Corrupted WordPress Core Files
At some point in your WordPress journey you’ll likely be hit by a core update gone wrong. This could be due to any number of reasons, but with a fairly predictable result: 500 internal server error. The solution generally involves replacing the corrupted files with fresh copies from a clean WordPress installation.
Here’s a step-by-step rundown to manually replace corrupted WordPress core files:
Step 1: Backup your existing WordPress files
As always, create a backup of your existing WordPress installation (yes, even if it isn’t working correctly).
Step 2: Download fresh WordPress files
Go to the official WordPress.org website and download the latest version of WordPress. Or just type the following into your browser’s address bar: https://wordpress.org/latest
Step 3: Open cPanel’s File Manager
Log into your cPanel account and head over to the public_html directory. Delete the wp-admin and wp-includes directories. DO NOT delete the wp-content directory.
When that’s done, delete all the WordPress files in the public_html directory (they are prefixed with wp-) EXCEPT the wp-config.php file.
Step 4: Upload fresh WordPress files
Extract the WordPress files you downloaded in Step 2 above. You can use the cPanel’s File Manager Window to upload them to the public_html directory – all EXCEPT the wp-content directory. (wp-config.php is created during installation.)
Step 5: Check your WordPress website
Open up your WordPress site to check if the issue is resolved. Navigate through the site to ensure that everything is loading as expected.
If you deactivated plugins or switched themes during troubleshooting, gradually reactivate your plugins one by one and switch back to your original theme, checking each time to see if the 500 internal server error reappears.
Incorrect file permissions
A 500 internal server error can also be caused by incorrect file permissions in the WordPress directory on the server.
“File permissions” refer to the settings that dictate who can read, write, and execute files and directories on the server. These permissions are crucial for security and functionality of websites, particularly those built on content management systems like WordPress.
Improper file permissions can lead to 500 internal server errors in several ways:
- Security Restrictions: Web servers like Apache or Nginx are configured to refuse to execute or serve files that have insecure permissions, which could potentially expose the server to vulnerabilities. For example, overly permissive settings (e.g., 777) can allow unauthorized users to execute harmful scripts.
- Incorrect Configuration: If essential files such as scripts or configuration files do not have the correct permissions set, the web server software might not be able to access them to perform its operations, thus leading to a 500 error.
- Executable Scripts: Files intended to be executed as scripts need to have execute permissions. If these permissions are incorrectly set, the server cannot execute them, which might cause a 500 error depending on the server’s configuration and the specific operations involved.
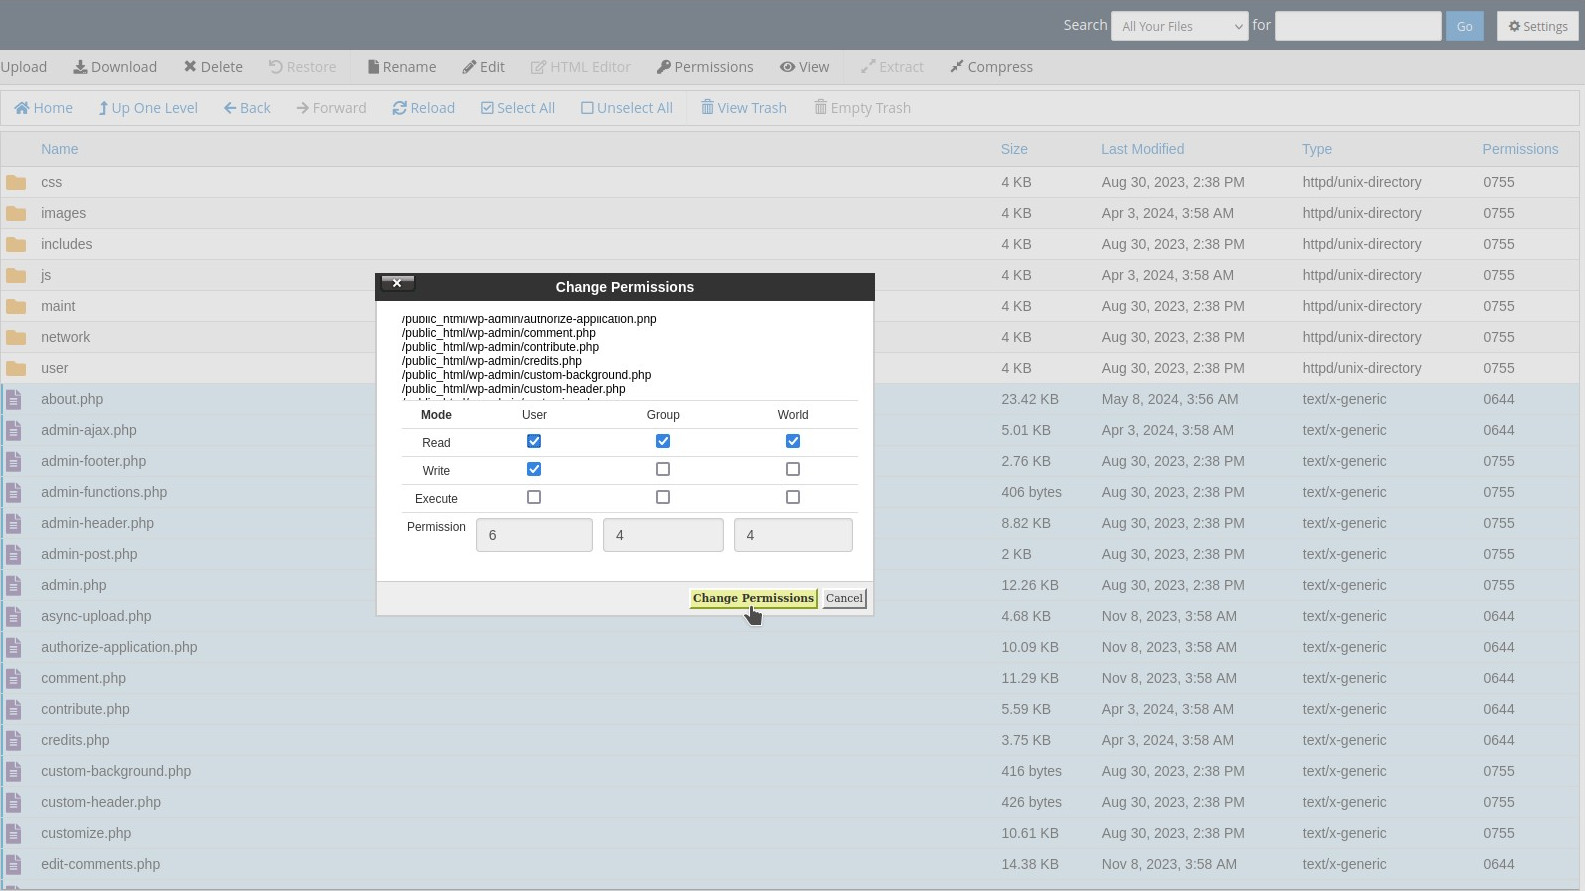
Here’s a guide to the recommended permissions for WordPress directories and files:
Directories:
755 is recommended for directories. This setting allows:
- The owner to read, write, and execute.
- Group and others to read and execute but not write.
This permission ensures that the owner can make changes to the directory structure, while preventing non-owners from altering the contents.
Files:
644 is recommended for files. This setting allows:
- The owner to read and write.
- Group and others to read only.
This permission setup is important for protecting sensitive files like wp-config.php, preventing unauthorized modifications while allowing the system to read these configurations.
How to change directory and file permissions (cPanel)
To change file or directory permissions in cPanel, navigate to the File Manager. Select all the objects (files and / or directories) for which you want to set permissions, and then right-click on any of the selected items. Use the popup that appears to set the required permissions as indicated above.
Understanding the common causes of server errors and knowing how to systematically address them can significantly ease the process of getting your WordPress website back on track. Whether it’s checking error logs, verifying .htaccess configurations, adjusting PHP memory limits, or ensuring your plugins and themes are compatible, each step you take is a move towards restoring your site’s functionality. Always ensure that you have robust backups before making changes, and consider conducting tests on a staging environment to avoid impacting your live site.
But if you’d rather spend those hours focusing on tasks that’ll move your business forward, Storm’s managed hosting shifts the responsibility to us.
More related news
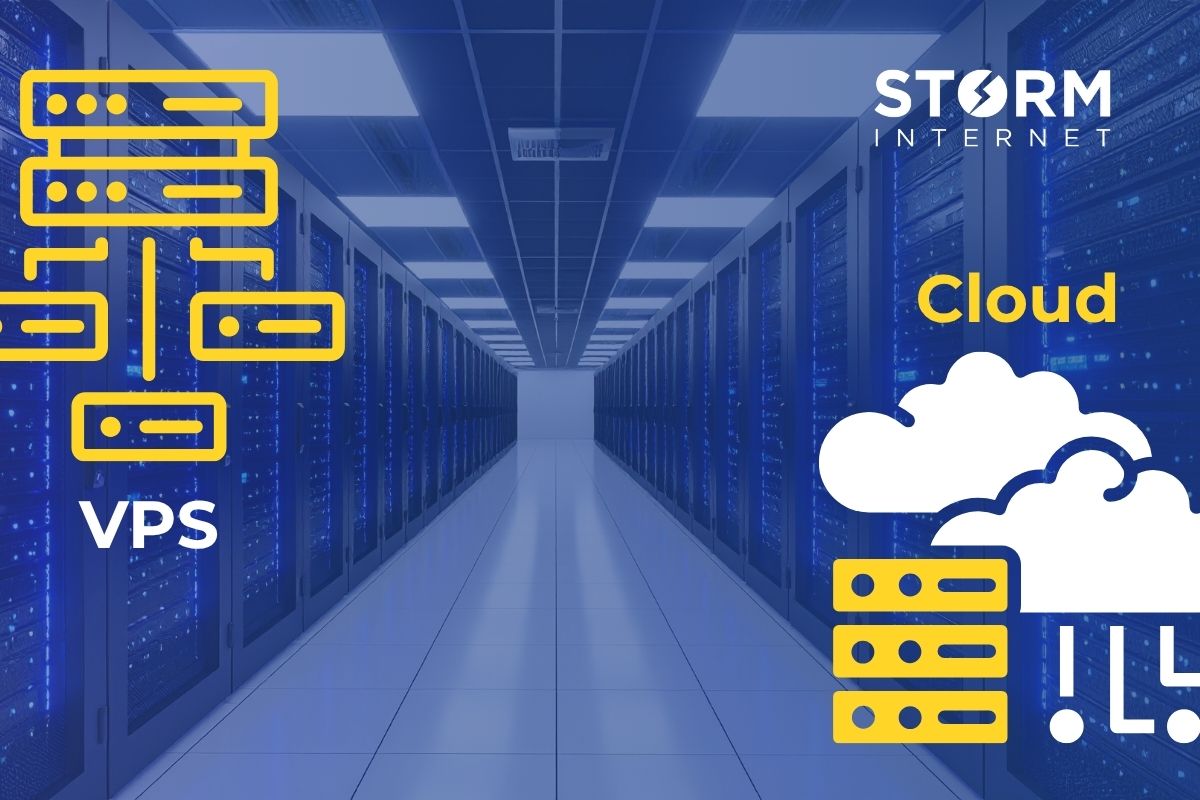
Cloud Hosting
Cloud Server vs VPS: What’s the Difference and Which Is Better for Your Business?
If you’re running a SaaS platform, digital agency, ecommerce store, education portal,...
Developers
Low-code + custom: when to use low-code tools in your SaaS stack (and when not to)
Low-code has become a practical part of many SaaS stacks – because...
Speak with a Storm Expert
Please leave us your details and we'll be in touch shortly
A Trusted Partner